Tips Tutorial Bersama: Windows
Showing posts with label Windows. Show all posts

Tuesday, May 27, 2025

Top Hidden Features You Did Not Know Exist in Windows 11

Top Hidden Features You Did Not Know Exist in Windows 11

Windows 11 is one of the most advanced operating systems released by Microsoft, featuring a sleek interface and enhanced performance. But beyond its visual appeal, there are numerous Windows 11 hidden features that many users overlook. These tools can significantly improve how you interact with your device.

If you’re someone who loves exploring Windows 11 tips and tricks, you’re in the right place. From powerful productivity enhancements to intuitive UI options, Windows 11 is packed with tools that can streamline your workflow. These Windows features are often buried deep in settings, making them easy to miss.

In this article, we’ll dive into some of the best Windows 11 secret settings you probably didn’t know existed. Whether you're a casual user or a tech enthusiast, these hidden options can make your experience smarter and more efficient.

1. Hidden Snap Layouts via Keyboard Shortcut

Snap Layouts in Windows 11 are a game-changer for multitasking, yet many users overlook their full potential. By using a specific keyboard shortcut, you can unlock hidden layout options that make it easier to organize multiple windows on your screen for improved productivity.

How to enable and use hidden Snap Layouts:

  1. Press the Windows key + I to open Settings
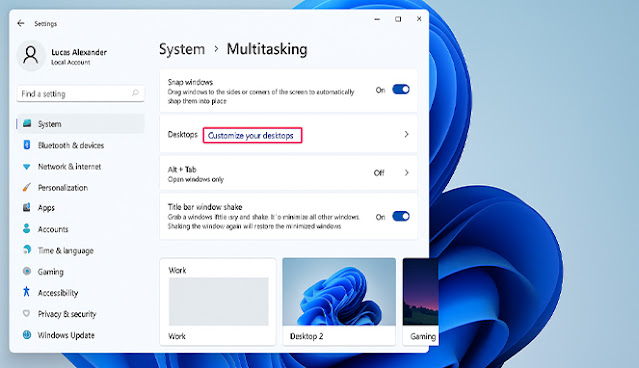
  2. Navigate to System and select Multitasking
  3. Make sure Snap windows is turned on
  4. Click the dropdown below it to reveal more options
  5. Enable all available Snap layout checkboxes
  6. Open any app window you'd like to snap
  7. Press Windows key + Z to display the Snap Layout options instantly

This feature helps you manage space more effectively, especially on large or ultra-wide monitors. By utilizing Snap Layouts through keyboard shortcuts, you can switch between tasks seamlessly and reduce clutter, making your workflow faster, smarter, and more intuitive on Windows 11.

2. Right-Clicking Start Menu for Quick Access Tools

Many users are unaware that Windows 11 includes a powerful hidden feature just beneath the Start button—an alternative menu that offers instant access to essential system tools. This shortcut is perfect for users who want faster navigation without digging through multiple menus or settings.

How to Enable and Use the Quick Access Menu:

  1. Hover your mouse over the Start button on the taskbar
  2. Right-click the Start button to reveal a hidden menu
  3. Alternatively, press Win + X on your keyboard for the same effect
  4. A list of system tools will appear, such as Device Manager and Task Manager
  5. Click on any tool from the list to launch it immediately
  6. Use the menu to access advanced tools like Disk Management and Terminal
  7. Explore this menu to save time when managing system settings

This simple yet powerful menu is a must-know shortcut for all Windows 11 users. It helps streamline system management tasks and provides direct access to important tools with just one click. Once you start using it, you’ll wonder how you ever lived without it.

3. Enable Clipboard History in Settings System

Windows 11 offers a powerful clipboard history feature that allows you to access multiple copied items with a single shortcut. This tool is especially useful for students, content creators, and multitaskers who often need to reuse text, links, or images without switching windows.

Follow these steps to enable Clipboard History in Windows 11:

  1. Click on the Start button or press the Windows key on your keyboard
  2. Select Settings from the Start Menu
  3. In the Settings window, click on System
  4. Scroll down and choose Clipboard from the left-hand menu
  5. Find the Clipboard history option on the right side of the window
  6. Toggle the switch to On to enable clipboard history
  7. Press Windows key + V to access your clipboard items anytime

Once enabled, you can quickly retrieve previously copied content without needing to re-copy it. Clipboard history saves time and improves productivity by storing up to 25 entries, even across multiple sessions. It’s a small but impactful feature that many users overlook.

4. Customize Virtual Desktops in System Multitasking

Windows 11 brings a powerful upgrade to virtual desktops, allowing users to organize their workflow across multiple desktop environments. Whether you’re juggling work, gaming, or personal tasks, customizing virtual desktops can help reduce clutter and increase focus throughout your day.

To activate and personalize virtual desktops in Windows 11, follow these steps:

  1. Click the Task View icon on the taskbar or press Win + Tab on your keyboard
  2. Select “New Desktop” in the bottom-right corner to create a new virtual desktop
  3. Right-click on the desktop preview and choose “Rename” to assign a custom name
  4. Click the desktop thumbnail to switch between desktops instantly
  5. Right-click again and select “Choose background” to set a unique wallpaper for each desktop
  6. Drag and drop open windows to any desktop for better organization
  7. Use Win + Ctrl + Left/Right Arrow to quickly switch between active desktops

Virtual desktops offer a flexible, distraction-free workspace in Windows 11. By customizing each environment to fit specific tasks, you can streamline your productivity and maintain better control over your digital workspace with ease and efficiency.

5. Hidden Emoji and Symbols Panel in Quick Settings

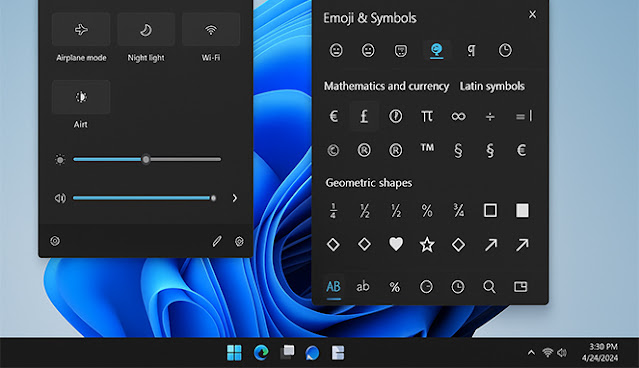
Many Windows 11 users are unaware that the system includes a powerful emoji and symbol panel hidden in plain sight. This feature allows you to easily insert emojis, kaomoji, and a wide range of symbols into your texts, documents, or social media posts without needing third-party tools.

How to activate and use the Emoji & Symbol Panel in Windows 11:

  1. Press the Windows key on your keyboard.
  2. While holding the Windows key, press either the period (.) or semicolon (;) key.
  3. A pop-up emoji panel will appear instantly on your screen.
  4. Browse through different tabs such as emoji, kaomoji, and symbols.
  5. Click on any item to insert it directly into your active text field.
  6. Use the search bar at the top to quickly find specific emojis or symbols.
  7. You can also pin your frequently used emojis for faster access in the future.

This built-in tool is especially useful for professionals, students, and content creators who often need expressive icons or special characters. With just a few keystrokes, you can elevate your communication and make your writing more dynamic and engaging.

6. Dynamic Refresh Rate for Optimized Display

Windows 11 introduces Dynamic Refresh Rate (DRR), a smart feature that balances performance and power efficiency by automatically adjusting your screen’s refresh rate. It ensures smoother visuals when needed—such as while scrolling or gaming—while conserving battery during low-demand tasks like reading or emailing.

How to enable Dynamic Refresh Rate in Windows 11:

  1. Open the Settings app from the Start menu or by pressing Win + I
  2. Select the System category from the sidebar
  3. Click on the Display option to access screen settings
  4. Scroll down and click on Advanced display settings
  5. Under Choose a refresh rate, look for a dynamic option in the dropdown
  6. Select the Dynamic (e.g., 60Hz - 120Hz) option if available
  7. Confirm and close the settings window

With DRR enabled, your laptop or supported monitor will intelligently adjust refresh rates to enhance user experience while optimizing power usage. This hidden feature is particularly useful for ultrabooks and gaming laptops, helping you get the best of both performance and battery life.

7. Use Voice Typing with Focus Mode

Windows 11 brings together two powerful features—Voice Typing and Focus Mode—to help users stay productive and minimize distractions. Whether you're writing reports, emails, or notes, voice typing can speed up the process while Focus Mode ensures you stay in the zone without interruptions.

Here’s how to activate Voice Typing and use it with Focus Mode in Windows 11:

  1. Press the Windows + H keys on your keyboard to open the Voice Typing tool
  2. Ensure your microphone is working properly and has been granted access in Settings
  3. Click the microphone button in the Voice Typing toolbar to start dictation
  4. Speak naturally, and Windows 11 will convert your speech to text in real time
  5. To enable automatic punctuation, click the Settings icon in the Voice Typing toolbar and toggle it on
  6. Open the Clock app from the Start Menu to access the Focus Sessions feature
  7. Set your desired focus duration, start the session, and use Voice Typing during this distraction-free time

Combining Voice Typing with Focus Mode is ideal for students, professionals, and remote workers who need to work efficiently. This integration allows you to dictate your thoughts effortlessly while maintaining concentration throughout your session, boosting both speed and productivity.

8. Launch Focus Sessions in Clock App

Windows 11 offers more than just visual upgrades—it also includes powerful tools to enhance your productivity. One hidden gem is Focus Sessions, available directly in the Clock app. This feature helps users maintain deep concentration using a built-in system focus timer and goal-setting tools.

How to enable and use Focus Sessions in Windows 11:

  1. Open the Start Menu and type "Clock" to launch the Clock app
  2. On the left sidebar, click on the "Focus sessions" option
  3. Click "Get started" if it’s your first time using the feature
  4. Set your desired focus time and break intervals
  5. Optionally sign in with your Microsoft account to sync with Microsoft To Do
  6. Connect your Spotify account if you want background music during focus time
  7. Click "Start focus session" to begin your personalized system focus period

With Focus Sessions, Windows 11 transforms your Clock app into a minimalist yet effective productivity assistant. Whether you're studying, working, or managing tasks, this hidden feature helps you stay committed and distraction-free—making system focus an effortless part of your daily routine.

9. Use Storage Sense for Smart Cleanup

Managing storage manually can be tedious, especially when your device begins to slow down due to cluttered files. Fortunately, Windows 11 comes with a built-in feature called Storage Sense, designed to automatically clear unnecessary files and help you maintain optimal system performance effortlessly.

Follow these steps to enable Storage Sense on your Windows 11 device:

  1. Open the Settings app by pressing Win + I on your keyboard
  2. Navigate to the System section in the left-hand menu
  3. Click on the Storage option to view available storage settings
  4. Scroll down and locate Storage Sense under the “Storage management” section
  5. Toggle the switch to turn Storage Sense on
  6. Click on Storage Sense to open detailed configuration options
  7. Customize how frequently files are deleted, such as temporary files, Recycle Bin items, and files in the Downloads folder

With Storage Sense activated, your PC will stay cleaner and run more efficiently over time. This intelligent cleanup tool works quietly in the background, so you can focus on your tasks without worrying about low disk space or performance drops.

10. Enable Title Bar Window Shake (Aero Shake)

Aero Shake is a simple yet powerful hidden feature in Windows 11 that helps you focus on a single task. By shaking the title bar of a window, you can minimize all other open windows instantly, keeping your workspace clean and distraction-free.

How to enable Aero Shake in Windows 11:

  1. Open the Start Menu and click on Settings
  2. In the left sidebar, select System
  3. Scroll down and choose Multitasking
  4. Look for the option called Title bar window shake
  5. Toggle the switch to On to enable the feature
  6. Close the settings window to apply the changes
  7. Now try clicking and shaking a window title bar to see it in action

Aero Shake is perfect when you need a moment of clarity on a cluttered screen. By activating this feature, you can instantly minimize distractions and regain focus, improving your efficiency with just a small movement of your mouse. Simple, smart, and effective.

Conclusion

Exploring the best features in Windows 11 allows users to unlock powerful tools that are often overlooked. These enhancements go beyond aesthetics, offering real productivity benefits. Whether you're a student, professional, or casual user, these features can improve how you interact with your system every day.

From dynamic refresh rates to clipboard history and Snap Layouts, these hidden Windows tools showcase the innovation behind Windows 11 Microsoft. Make the most of your experience by diving deeper into the OS settings and uncovering tools that elevate functionality and simplify daily tasks.

Monday, May 26, 2025

How to Set Up and Use Microsoft Edge in Windows 11

How to Set Up and Use Microsoft Edge in Windows 11

Microsoft Edge is the default browser that comes pre-installed with Windows 11, offering improved speed, security, and integration with Microsoft services. With the seamless performance of Microsoft Edge Windows 11, users can enjoy a streamlined browsing experience tailored to modern needs. It's designed to work efficiently across devices and platforms.

Edge not only supports extensions and tab management but also includes unique features like vertical tabs, collections, and sleeping tabs. These tools help enhance productivity while browsing, making it a preferred choice for users looking for Windows 11 tips and tricks to maximize performance.

Whether you're a new Windows user or switching from another browser, this article serves as a complete Microsoft Edge setup guide. Learn how to customize your settings, import data, and explore features that make Edge a powerful browsing solution in Windows 11.

Why Microsoft Edge Is the Best Web Browser for Windows 11

Microsoft Edge offers more than just web browsing—it delivers a highly integrated experience for Windows 11 users. With the ability to customize Edge browser settings and utilize features tailored for productivity, Edge stands out as a top choice for both casual and professional users.

  1. Built on the Chromium engine, Microsoft Edge ensures fast performance, compatibility with Chrome extensions, and smooth browsing on all modern websites.
  2. It consumes less memory and CPU compared to other browsers, optimizing system performance and battery life on Windows 11 devices.
  3. Seamless synchronization across devices allows you to access your bookmarks, history, passwords, and open tabs anywhere with your Microsoft account.
  4. Edge includes a built-in PDF reader, web capture tool, and immersive reader—perfect for students, professionals, and everyday users.
  5. Advanced privacy controls and tracking prevention features help protect your online activity without compromising usability.
  6. Collections and vertical tabs improve organization and efficiency, making multitasking and research easier than ever.
  7. Deep integration with Windows 11 features like Snap Layouts and Cortana enhances your workflow and boosts productivity.

Microsoft Edge is more than a browser—it's a productivity hub tailored for the Windows 11 environment. With intuitive tools and the ability to fully personalize your experience, it's no surprise that Edge is becoming the preferred browser for millions of Windows users.

How to Install Microsoft Edge in Windows 11

Although Microsoft Edge comes pre-installed on most Windows 11 devices, there may be cases where it needs to be reinstalled—whether due to system errors, accidental uninstallation, or corrupted files. Here’s a simple step-by-step guide to help you install Microsoft Edge easily and correctly.

  1. Open your preferred web browser such as Chrome or Firefox on your Windows 11 device
  2. Go to the official Microsoft Edge download page at https://www.microsoft.com/edge
  3. Click the “Download” button and choose the correct version for Windows 11
  4. Once the installer file is downloaded, double-click to launch the setup process
  5. Follow the on-screen instructions to complete the installation
  6. After installation, open Microsoft Edge and wait for the initial configuration to finish
  7. Optionally, sign in with your Microsoft account to sync settings and browsing data

Installing Microsoft Edge in Windows 11 is a fast and secure process, especially when done from the official website. With the latest updates and features, Microsoft Edge delivers a modern browsing experience that’s optimized for performance, productivity, and seamless integration with the Windows ecosystem.

Step-by-Step Guide to Set Up Microsoft Edge

Setting up Microsoft Edge in Windows 11 is a simple process that ensures you get the most out of your browsing experience. Whether you're new to the browser or switching from another, following these steps will help you start using Edge quickly and efficiently.

Step 1: Launch Microsoft Edge

Before you can start exploring the features of Microsoft Edge in Windows 11, you need to know how to properly launch the browser. Whether you're a first-time user or just switched from another browser, these steps will help you access Edge quickly and easily.

  1. Click the Start button on the bottom-left corner of your screen.
  2. Type Microsoft Edge into the search bar that appears.
  3. Locate the Microsoft Edge app in the search results.
  4. Click on the Microsoft Edge icon to open the browser.
  5. Wait for the browser window to fully load before proceeding to the next setup step.

Step 2: Sign In and Sync Your Data

To get the most out of Microsoft Edge on Windows 11, it’s important to sign in with your Microsoft account. This allows you to sync data like bookmarks, passwords, and history across all your devices, creating a seamless and personalized browsing experience.

  1. Open Microsoft Edge and look for the profile icon located in the top-right corner of the browser window
  2. Click the profile icon to open the account menu and select the Sign in option
  3. Enter your Microsoft account email address and password to continue
  4. Follow the on-screen prompts to confirm your identity and complete the sign-in process
  5. After signing in, enable sync to synchronize your favorites, extensions, settings, and more across your devices

Step 3: Set Microsoft Edge as Your Default Web Browser

Setting Microsoft Edge as your default web browser ensures a seamless experience across all your browsing activities on Windows 11. By making this adjustment, every link you click—whether from email, documents, or other apps—will open directly in Microsoft Edge.

  1. Click on the Start menu and open Settings.
  2. Select Apps from the sidebar, then click on Default apps.
  3. In the search bar, type Microsoft Edge and click on it from the results.
  4. Scroll through the list of file types and protocols such as .html, .htm, HTTP, and HTTPS.
  5. For each entry, click on the current default and select Microsoft Edge from the list that appears.

By completing these setup steps, you’ll have a fully configured Microsoft Edge browser tailored to your preferences. From syncing data to setting it as your default browser, these actions enhance your browsing performance and ensure seamless integration with other features in Windows 11.

Importing Data from Internet Explorer or Other Browsers

If you're transitioning to Microsoft Edge from Internet Explorer, Chrome, or another browser, importing your data ensures a seamless browsing experience. You won't lose important bookmarks, history, saved passwords, or settings. The process is quick, secure, and helps you stay productive instantly.

1. Benefits of Importing Browser Data

  1. Keep all your favorite bookmarks without manual transfer
  2. Retain saved login credentials for websites you visit regularly
  3. Preserve your browsing history for easier access to previous content
  4. Carry over settings and preferences to reduce setup time
  5. Enhance productivity by minimizing the need to start from scratch

2. Steps to Import Browser Data

  1. Open Microsoft Edge and click the three-dot menu at the top-right corner
  2. Select Settings and navigate to the Profiles section
  3. Click on Import browser data
  4. Choose the browser you want to import from in the dropdown list
  5. Select the data you want to import and click Import

Transferring your data into Microsoft Edge helps maintain continuity and improves your overall experience with Windows 11. Whether for work or personal use, you can pick up right where you left off in your previous browser—now with better speed and integration.

Customizing Microsoft Edge for Maximum Productivity

Customizing Microsoft Edge in Windows 11 allows you to create a more efficient and personalized browsing experience. By adjusting key settings, installing useful extensions, and leveraging built-in tools, you can transform Edge into a powerful productivity hub tailored to your daily workflow.

1. Personalize Your Start Page

Customizing your Microsoft Edge start page allows you to create a more personal and productive browsing experience. Whether you prefer a minimal layout or rich visual content, Edge gives you several options to tailor the start page to match your style and needs.

  1. Open Microsoft Edge and launch a new tab to access the start page
  2. Click the gear icon located at the top right corner of the new tab page
  3. Choose a layout style such as Focused, Inspirational, or Informational
  4. Select Custom to manually adjust content visibility like quick links or background
  5. Save your preferences and the new layout will apply automatically to future tabs

2. Install Extensions

Installing browser extensions can enhance Microsoft Edge with added functionality, improved productivity, and customization. Since Edge is based on Chromium, it supports extensions from both the Microsoft Edge Add-ons store and the Chrome Web Store, giving users access to thousands of useful tools.

  1. Open Microsoft Edge and click the three-dot menu icon in the top-right corner
  2. Select Extensions from the dropdown menu and then click Manage extensions
  3. On the extensions page, enable the toggle for Allow extensions from other stores
  4. Visit the Chrome Web Store using the Edge browser
  5. Find the extension you want and click Add to Chrome to install it

3. Use Features Like Vertical Tabs and Collections

Microsoft Edge offers powerful tools such as Vertical Tabs and Collections to help users stay organized while browsing. These features are especially useful for multitasking, research, and managing multiple pages at once. Here’s how to make the most of them in Windows 11.

  1. Click the tab actions menu located at the top-left corner of your browser window
  2. Select the option to turn on Vertical Tabs for a cleaner and more focused tab layout
  3. To start a Collection, click the Collections icon on the top-right menu bar
  4. Choose Start new collection and give it a name to begin organizing content
  5. Drag web pages, images, or notes into your collection for easy access later

With the right customizations, Microsoft Edge becomes more than just a browser—it becomes a productivity tool. From streamlined layouts to helpful extensions, these features can save time and improve focus. Explore the options to ensure your browser supports your goals and enhances your online efficiency.

Powerful Features to Explore

Microsoft Edge on Windows 11 isn’t just a basic web browser—it’s packed with advanced tools designed to enhance productivity, improve performance, and provide a more secure browsing experience. Below are seven powerful features you should start using to get the most out of Edge.

  1. Vertical Tabs: Easily manage multiple tabs by switching to a vertical layout. This helps improve readability and gives you a clearer view of your open pages.
  2. Collections: Group related websites, images, and notes into shareable collections—perfect for research, planning trips, or organizing work projects.
  3. Sleeping Tabs: Improve system performance by putting inactive tabs to sleep, freeing up memory and extending battery life on laptops.
  4. Startup Boost: Launch Microsoft Edge faster every time by enabling Startup Boost, which preloads key processes in the background.
  5. Web Capture: Take screenshots of full webpages or selected sections and annotate them directly within the browser for easy sharing or note-taking.
  6. Read Aloud: Convert text on any webpage into spoken words. This feature supports multiple languages and is great for learning, multitasking, or accessibility.
  7. Built-in Security Tools: Stay protected with features like Microsoft Defender SmartScreen and tracking prevention modes that block harmful sites and limit data tracking.

These features make Microsoft Edge a smart choice for users looking for speed, organization, and safety online. Whether you're working, studying, or browsing casually, exploring these tools can significantly enhance your web experience.

Privacy and Security Settings

Ensuring your privacy and maintaining security while browsing the web is essential in today’s digital world. Microsoft Edge in Windows 11 provides robust tools to help you control what data is collected, how it’s used, and how you can stay safe online while browsing efficiently.

  1. Open Microsoft Edge and click the three-dot menu in the top-right corner
  2. Select Settings and navigate to the Privacy, Search, and Services section
  3. Choose your preferred tracking prevention level from Basic, Balanced, or Strict
  4. Enable Microsoft Defender SmartScreen to protect against malicious sites and downloads
  5. Turn on the "Always use HTTPS" option for secure browsing
  6. Manage permissions such as location, camera, and microphone in the Site Permissions tab
  7. Clear browsing data regularly, including history, cookies, and cached files for better security

By properly configuring your privacy and security settings, you can browse with greater confidence and peace of mind. Taking a few minutes to adjust these features ensures your personal data stays protected and your browsing experience remains both private and secure.

Common Issues and How to Fix Them

Even though Microsoft Edge on Windows 11 is designed for stability and performance, users may occasionally encounter technical problems. Whether it’s startup failures, slow browsing, or sync issues, these problems can usually be resolved quickly with the right steps. Here are the most common issues and how to fix them.

1. Microsoft Edge Won’t Open

If Edge doesn’t launch when clicked, follow these steps:

  1. Press Windows + I to open Settings.
  2. Go to Apps > Installed Apps, locate Microsoft Edge, click Advanced Options.
  3. Select Repair first. If that doesn’t work, click Reset.

2. Edge Is Running Slowly

Slow performance is often caused by unnecessary extensions or browsing data:

  1. Go to Settings > Privacy, Search, and Services.
  2. Under Clear browsing data, choose to clear cache and cookies.
  3. Disable unused extensions via Settings > Extensions.

3. Sync Isn’t Working

When your data isn’t syncing across devices:

  1. Click your profile icon and make sure you’re signed in.
  2. Navigate to Settings > Profiles > Sync and ensure all toggles are enabled.
  3. Check your internet connection and try signing out and back in again.

4. Crashes or Unexpected Shutdowns

Frequent crashes may indicate a corrupted installation or conflict:

  1. Disable all extensions to rule out third-party issues.
  2. Run Windows Update to ensure your OS is current.
  3. Reinstall Microsoft Edge from the official Microsoft website if the problem persists.

5. Can’t Set Edge as Default Browser

If Edge doesn’t stick as your default browser:

  1. Open Settings > Apps > Default Apps.
  2. Scroll to Microsoft Edge, and manually assign it to each file type and protocol (e.g., .html, .htm, HTTP, HTTPS).

6. Webpages Not Loading Properly

If certain sites are broken or display incorrectly:

  1. Clear cache and cookies.
  2. Try loading the page in InPrivate mode.
  3. If the issue persists, check the Site Permissions under Settings > Cookies and site permissions.

7. Edge Freezes or Becomes Unresponsive

When Edge stops responding:

  1. Press Ctrl + Shift + Esc to open Task Manager and end the Edge task.
  2. Restart the browser.
  3. Disable Startup Boost in Settings > System and Performance if the issue recurs on startup.

Microsoft Edge is regularly updated to fix bugs and enhance performance. Staying updated and performing occasional maintenance can significantly reduce the chance of problems. With these solutions, you can restore a smooth and productive browsing experience in Windows 11.

Conclusion

Understanding how to use Edge in Windows 11 can help you browse faster, stay more organized, and protect your privacy. With features like vertical tabs, collections, and SmartScreen protection, Microsoft Edge offers both simplicity and power for everyday users and professionals alike.

By customizing settings and syncing your data across devices, you can fully take advantage of what Microsoft Edge has to offer. Make it your default browser today and enjoy seamless integration with Windows 11 for a smarter, more efficient browsing experience.

Sunday, May 25, 2025

Best Settings to Optimize Battery Life in Windows 11

Best Settings to Optimize Battery Life in Windows 11

Battery performance plays a vital role in how efficiently your laptop operates throughout the day. Whether you're working remotely or attending online classes, the right Windows 11 power settings can make a significant difference in how long your device stays powered. Optimizing these settings ensures you get the most out of every charge.

With some minor adjustments and smart habits, you can greatly improve your laptop’s energy efficiency. From reducing screen brightness to disabling background apps, this guide covers essential Windows 11 tips and tricks that help you save battery without sacrificing performance. It's not just about longevity—it's about smarter usage.

We'll also walk you through how to change power plan Windows 11 to match your specific needs. Whether you need maximum performance or maximum battery life, the right plan can make all the difference.

Why Power Settings Matter for Battery Life

Power settings play a critical role in determining how efficiently your Windows 11 device uses energy. By customizing these settings, you can extend your battery life, reduce overheating, and improve overall performance—especially when you're working remotely or without access to a power outlet.

  1. They help minimize unnecessary power usage by adjusting performance levels when the device is idle
  2. They allow your system to allocate resources more efficiently during light or heavy tasks
  3. They reduce screen brightness and timeout durations to prevent energy waste
  4. They stop background apps from draining battery power unnecessarily
  5. They disable unused features like Bluetooth or location services to save energy
  6. They activate Battery Saver mode to limit system performance and notifications
  7. They enable hibernation instead of sleep to cut down passive power consumption

Optimizing power settings is a smart and simple way to get the most out of your battery. With small adjustments, you can prevent premature battery degradation and ensure your device stays ready for use throughout the day.

Best Settings to Optimize Battery Life in Windows 11

To extend your laptop's battery life, it's crucial to adjust sleep settings in Windows 11 and fine-tune other power options. Windows 11 offers various built-in tools to help users manage energy efficiently and reduce unnecessary battery drain while maintaining smooth performance for everyday computing tasks.

1. Activate Battery Saver Mode

Battery Saver Mode in Windows 11 is a quick and effective feature to extend battery life, especially when you're away from a power source. By limiting background activities and reducing system performance slightly, it helps conserve power during critical moments of use.

How to Activate Battery Saver Mode:

  1. Open Settings from the Start Menu or by pressing Windows + I
  2. Click on System then choose Power & Battery
  3. Scroll down to the Battery Saver section
  4. Toggle Battery Saver on manually or set it to turn on automatically at a chosen battery level
  5. Optionally, reduce screen brightness when Battery Saver is active for additional savings

2. Choose the Best Power Mode

Selecting the right power mode in Windows 11 can make a significant difference in how long your battery lasts throughout the day. By adjusting the power level to match your usage, you can extend battery life without sacrificing essential performance for everyday tasks.

How to choose the best power mode:

  1. Open Settings from the Start menu or by pressing Windows + I.
  2. Click on System, then select Power & battery from the left-hand menu.
  3. Scroll down to the Power Mode section under the "Battery" category.
  4. Click the dropdown menu to view available options like Best power efficiency, Balanced, and Best performance.
  5. Choose Best power efficiency for maximum battery savings, especially when you're not running demanding applications.

3. Optimize Screen and Sleep Settings

The display is one of the primary components that drains battery power, especially during prolonged use. By adjusting screen brightness and sleep timing, you can significantly reduce energy consumption and extend your device's battery life without compromising functionality or productivity.

Steps to Adjust Screen and Sleep Settings:

  1. Open Settings and go to System, then select Power & Battery
  2. Scroll down and click on Screen and sleep to expand the section
  3. Set the screen to turn off after 5 minutes when using battery power
  4. Set the device to go to sleep after 10 minutes when on battery
  5. Reduce screen brightness manually or enable battery saver to adjust it automatically

4. Customize Power Plan Through Control Panel

While Windows 11 prioritizes simplicity, the traditional Control Panel still offers deeper customization for power settings. Adjusting your power plan manually allows you to fine-tune how your device uses energy, helping you strike the perfect balance between performance and battery efficiency.

Steps to customize your power plan:

  1. Open the Start menu and search for Control Panel, then select it from the results
  2. Click on Hardware and Sound, then choose Power Options
  3. Next to your active plan, click Change plan settings
  4. Select Change advanced power settings to open a detailed configuration window
  5. Expand categories like Processor power management and Sleep, then modify settings to optimize battery usage

5. Disable Unnecessary Background Apps

Many applications continue running in the background even when you're not actively using them, consuming valuable system resources and draining your battery. Disabling these apps can significantly improve battery life and system performance, especially on portable devices like laptops and tablets.

Steps to disable background apps:

  1. Open the Settings menu by pressing Windows + I.
  2. Click on Apps, then choose Installed apps from the list.
  3. Find an app you rarely use and click the three-dot menu beside it.
  4. Select Advanced options to access more settings for that app.
  5. Under Background apps permissions, choose Never to prevent it from running in the background.

6. Turn Off Bluetooth and Wi-Fi When Idle

When you're not actively using Bluetooth or Wi-Fi, keeping them turned on can lead to unnecessary battery drain. Even when not connected, these features continue scanning for signals in the background, using up valuable power. Disabling them when idle can significantly extend battery life.

How to disable Bluetooth and Wi-Fi when not in use:

  1. Open the Quick Settings panel by pressing Windows + A
  2. Click the Bluetooth icon to turn it off when no devices are connected
  3. Click the Wi-Fi icon to disable it if you’re not using the internet
  4. Go to Settings > Network & internet to manage wireless settings more thoroughly
  5. Consider enabling Airplane Mode when you want to disable all wireless connections instantly

7. Keep Drivers and Windows Updated

Keeping your system up to date is essential for maintaining optimal system power efficiency and battery performance. Outdated drivers or a lagging operating system can lead to unnecessary power drain, system instability, and reduced device lifespan. Ensuring everything is current helps your laptop run smoother and consume less energy.

Follow these steps to check for updates:

  1. Open Settings from the Start menu and select Windows Update
  2. Click Check for updates to see if any new system updates are available
  3. If updates are found, click Download and install and wait for the process to complete
  4. To update drivers, open Device Manager by searching from the Start menu
  5. Right-click each essential component (like display adapter, network adapter) and choose Update driver

8. Enable Hibernate Instead of Sleep

When you put your laptop to sleep, it still consumes a small amount of power to keep your session in memory. Hibernate mode, on the other hand, saves your current session to the hard drive and completely powers off the device, which helps conserve more battery when you won't be using your laptop for a while.

Follow these steps to enable Hibernate mode on Windows 11:

  1. Open the Control Panel and navigate to Power Options
  2. Select Choose what the power buttons do from the left sidebar
  3. Click on Change settings that are currently unavailable to unlock the options
  4. Check the box for Hibernate under Shutdown settings
  5. Save the changes and close the window

9. Generate and Analyze Battery Report

Understanding your laptop’s battery health and usage patterns can help you make informed decisions to improve battery life. Windows 11 allows you to generate a detailed battery report that provides insights into battery capacity, usage history, and potential issues affecting performance.

Steps to generate and view your battery report:

  1. Open the Start menu and type Command Prompt then select Run as administrator
  2. In the Command Prompt window, type powercfg /batteryreport and press Enter
  3. Note the file path where the battery report is saved, usually in your user folder
  4. Open File Explorer and navigate to the saved report location
  5. Double-click the report file (battery-report.html) to view it in your default web browser

By customizing power modes, disabling background apps, and reducing screen brightness, you can dramatically improve battery performance. These simple yet effective changes ensure your device stays powered longer. Mastering Windows 11 power settings is key to achieving a more energy-efficient and mobile-friendly computing experience.

Conclusion

Optimizing the best power settings for performance Windows 11 is key to balancing battery life and productivity. By adjusting power modes, enabling Battery Saver, and managing screen timeout, you can extend your laptop’s battery without sacrificing essential functions. These tweaks help maintain smooth performance while saving energy.

Regularly updating your system and monitoring background apps also supports longer battery life. With these simple but effective steps, you’ll get the most out of your Windows 11 device, improving both efficiency and overall user experience.

Saturday, May 24, 2025

How to Secure Your Windows 11 Device from Threats

How to Secure Your Windows 11 Device from Threats

In today's digital landscape, ensuring strong Windows 11 security is more important than ever. With rising threats like malware, phishing attacks, and ransomware, protecting your device should be a top priority. Windows 11 includes advanced tools designed to safeguard your personal data and prevent unauthorized access.

Whether you use your computer for work or daily browsing, securing your system doesn’t have to be complicated. There are practical steps you can take to improve safety, ranging from software updates to password protection. These essential measures can greatly reduce your exposure to online threats.

This guide will walk you through the most effective strategies using built-in tools like Windows Security Center. We’ll also highlight some helpful Windows 11 tips and tricks to boost your device's performance and keep your data safe from harm.

Why Security Matters in Windows 11

Windows 11 introduces advanced security features to help protect users in an increasingly dangerous digital environment. One of the key components is Microsoft Defender Antivirus, which provides real-time protection against malware and other threats. With built-in tools like this, users have a strong first line of defense.

However, relying solely on default settings isn't enough. Cybercriminals constantly evolve their methods, targeting unsuspecting users through phishing emails, malicious downloads, and network vulnerabilities. Enhancing your system’s security with proactive steps ensures a higher level of protection against both common and sophisticated threats.

Your personal data, financial information, and sensitive files are all valuable targets. Taking security seriously means preserving your privacy, preventing identity theft, and maintaining full control over your device. Securing Windows 11 is not optional—it’s essential for every user in today’s connected world.

How to Secure Your Windows 11 Device from Threats

As cyber threats continue to evolve, securing your Windows 11 device has never been more critical. From malware to phishing attacks, users must take proactive steps to protect personal data and ensure device safety. This guide provides essential tips to enhance your Windows 11 security.

1. Keep Your Windows 11 Updated

Keeping your Windows 11 operating system up to date is essential to maintaining the security, stability, and performance of your device. Each update from Microsoft includes critical security patches that protect your system from new and emerging threats targeting vulnerabilities in the operating system.

  1. Open the Settings app from the Start menu
  2. Select Windows Update from the sidebar
  3. Click on Check for updates to search for the latest releases
  4. Download any available updates shown on the screen
  5. Restart your device to complete the installation process
  6. Enable Automatic updates to keep your system consistently protected
  7. Set active hours to avoid interruptions during your regular usage time

By staying current with updates, you ensure that your Windows 11 operating system is equipped with the latest defenses. This not only reduces the risk of cyberattacks but also improves your device's overall reliability and user experience over time.

2. Utilize Windows Firewall and Microsoft Defender Antivirus

Keeping your Windows 11 device safe starts with using the tools already built into the system. Windows Firewall and Microsoft Defender Antivirus work together to block unauthorized access and neutralize threats in real-time, making them essential for your overall security strategy.

Follow these steps to ensure maximum protection:

  1. Open the Start menu and type Windows Security, then press Enter
  2. Click on Virus & threat protection to view your antivirus status
  3. Ensure Real-time protection is turned on under Virus & threat protection settings
  4. Navigate back and click on Firewall & network protection
  5. Check that all three network profiles (Domain, Private, Public) have the firewall enabled
  6. Click on each network profile to confirm the firewall toggle is switched to On
  7. Go to App & browser control and turn on SmartScreen for apps and files

Taking advantage of Windows Firewall and Microsoft Defender Antivirus provides strong first-line defense against malware, spyware, and other malicious threats. With regular checks and updates, you can ensure your security settings remain active and your system remains protected around the clock.

3. Enable Secure Boot and BitLocker Encryption

Securing your device at the hardware level is crucial to prevent unauthorized access and protect your system integrity. Two essential features in Windows 11—Secure Boot and BitLocker—work together to defend against rootkits, boot-time malware, and data theft, especially if your device is lost or stolen.

Follow these steps to enable Secure Boot and BitLocker Encryption on Windows 11:

  1. Restart your computer and enter the BIOS or UEFI settings by pressing the key displayed during startup (usually Del, F2, or Esc)
  2. Navigate to the Boot or Security tab and locate the Secure Boot option
  3. Make sure Secure Boot is enabled and save the BIOS settings
  4. Boot into Windows 11 and go to Settings
  5. Select Privacy & Security then click Device Encryption or BitLocker Drive Encryption
  6. Click Turn on BitLocker and choose how you want to unlock your drive at startup
  7. Save your recovery key in a secure location and complete the encryption process

Enabling these features ensures your device boots only with trusted software and your data remains encrypted from prying eyes. By adding this extra layer of protection, you greatly reduce the chances of cybercriminals accessing your sensitive files or tampering with your system.

4. Protect Your Identity with Strong Authentication

Securing your digital identity is crucial in today’s interconnected world. Without strong authentication methods, your personal data and online accounts become vulnerable to unauthorized access. Implementing multi-layered security is one of the best strategies to achieve identity protection on your Windows 11 device.

  1. Create complex and unique passwords for each of your accounts
  2. Avoid using personal information like birthdates or names in passwords
  3. Enable Windows Hello for biometric authentication such as fingerprint or facial recognition
  4. Activate two-step verification for your Microsoft and other essential accounts
  5. Use a reliable password manager to store and manage your credentials securely
  6. Frequently update your passwords, especially after any data breach alerts
  7. Review and manage sign-in activity through your Microsoft account settings regularly

By following these best practices, you can greatly enhance your Windows 11 security while maintaining effective identity protection. It only takes a few simple changes to make it much harder for cybercriminals to gain access to your sensitive information. Don’t wait—secure your identity now.

5. Secure Your Network Connection

Your network connection is a critical entry point that cybercriminals often target. Whether you’re using a home Wi-Fi network or connecting to public internet access points, taking proactive steps to secure your connection can significantly reduce the risk of data theft, hacking, or malware infiltration.

  1. Change your router’s default admin username and password immediately after installation
  2. Enable WPA3 encryption on your Wi-Fi router, or WPA2 if WPA3 is not available
  3. Hide your network SSID to make it less visible to unauthorized users
  4. Set up a separate guest network for visitors to avoid sharing your main connection
  5. Regularly update your router firmware to patch any security vulnerabilities
  6. Disable WPS (Wi-Fi Protected Setup) as it can be exploited by attackers
  7. Use a reliable VPN service when accessing the internet from public or unsecured networks

A secure network connection creates the foundation for all other digital protections. By following these essential steps, you ensure that your internet traffic remains private, your devices stay protected, and your sensitive data is less vulnerable to being intercepted by cyber threats.

6. Download Apps Safely

Downloading apps from unknown sources can pose serious security risks to your Windows 11 device. To avoid malware, spyware, or other harmful software, follow these safe downloading practices. Staying vigilant will help protect your system and ensure that every app you install is trustworthy.

  1. Always download apps from the official Microsoft Store
  2. Check app ratings and read user reviews before installing
  3. Verify the developer or publisher of the app
  4. Enable Smart App Control to block untrusted or malicious apps
  5. Avoid downloading cracked or pirated software from third-party websites
  6. Keep your device’s security settings and antivirus updated
  7. Uninstall apps you no longer use or recognize

By following these steps and using tools like Smart App Control, you can significantly reduce the risk of security breaches. Responsible downloading habits ensure your Windows 11 system remains clean, efficient, and protected from unwanted threats and vulnerabilities introduced by unsafe applications.

7. Backup Data and Monitor Security Health

Backing up your data and keeping an eye on your device’s security health are essential habits for every Windows 11 user. These steps not only protect your files from unexpected loss but also help identify and respond to threats before they cause serious damage.

  1. Access Settings, then navigate to System > Storage > Advanced storage settings and select Backup options.
  2. Enable OneDrive backup to automatically sync your Desktop, Documents, and Pictures folders to the cloud.
  3. Use an external hard drive or reliable third-party backup software for offline backup copies.
  4. Turn on File History to regularly save versions of your files and easily recover previous ones.
  5. Set a recurring backup schedule to ensure your data is updated without manual input.
  6. Open Windows Security and check the Device performance & health tab for any system issues.
  7. Review the Windows Security dashboard weekly to monitor antivirus status, firewall protection, and app health.

Creating consistent backup routines and monitoring your device’s security status will give you peace of mind. Even if your system is compromised, you’ll have the tools and data needed to recover quickly and continue working without disruption.

Protecting your Windows 11 device requires a layered approach—combining system updates, strong authentication, and smart browsing habits. By following these strategies, you can significantly reduce your vulnerability to threats. Stay vigilant and keep your digital environment secure for a safer computing experience every day.

Conclusion

Using Windows Hello enhances your device’s security by providing a fast, secure sign-in method. Along with Windows 11’s built-in security processor, it forms a strong security solution to protect your data and privacy. Always ensure you are running the latest version of Windows for optimal protection.

To keep your Windows 11 device safe, combine these features with regular updates and cautious online habits. Together, they create a comprehensive defense against cyber threats and help maintain your device’s integrity in today’s digital landscape.

Friday, May 23, 2025

Step by Step Guide to Managing Storage in Windows 11

Step by Step Guide to Managing Storage in Windows 11

Managing your computer’s storage is essential for maintaining speed and performance, especially if you're using a modern operating system like Windows 11. One of the most effective methods is using Disk Cleanup Windows 11, a built-in utility that helps you delete unnecessary files and free up space effortlessly.

As your PC accumulates temporary files, system logs, and other junk data over time, it's important to have regular maintenance habits. Following simple Windows 11 tips and tricks can help you stay on top of storage issues while improving your device's overall performance and longevity.

This guide will walk you through how to run Disk Cleanup on Windows 11, step by step. Whether you're tech-savvy or a casual user, these instructions will ensure your system stays optimized and clutter-free with minimal effort.

Why You Should Manage Your Storage on Windows 11

Regular storage management plays a critical role in maintaining a smooth computing experience. One of the most effective ways to do this is by performing a Windows 11 clean up temporary files routine, ensuring your system stays clutter-free and functions at its best.

  1. Improves overall system performance and responsiveness
  2. Frees up valuable disk space for important files and applications
  3. Reduces the risk of system crashes and unexpected errors
  4. Speeds up software installation and update processes
  5. Helps prevent lag and delays during multitasking
  6. Minimizes wear and tear on SSD or hard drives
  7. Enhances startup and shutdown times
  8. Optimizes system resources for gaming and productivity
  9. Ensures smoother Windows 11 feature and security updates
  10. Prevents unnecessary background processes from consuming space

Keeping your storage well-managed is more than just digital housekeeping—it's essential to ensure long-term stability and performance. Make storage management a regular habit to enjoy a faster, more efficient Windows 11 experience every day.

How to Perform Disk Cleanup in Windows 11

Performing a disk cleanup in Windows 11 is a simple yet powerful way to boost your PC’s performance. Over time, your system accumulates temporary files, cache, and outdated data that consume valuable storage. Here’s a step-by-step guide to help you clean it efficiently.

1. Launch Disk Cleanup from the Search Box

One of the simplest and most effective ways to free up space on your Windows 11 PC is by using the built-in Disk Cleanup tool. This method allows you to remove unnecessary system files, temporary files, and cached data in just a few clicks.

  1. Press the Windows key on your keyboard to open the Start menu
  2. Type Disk Cleanup into the search box
  3. Select the Disk Cleanup app from the search results
  4. Choose the drive you want to clean, typically the C: drive
  5. Click OK to allow Windows to calculate available cleanup space
  6. Review the list of file categories and check those you want to delete
  7. Click OK and then confirm by selecting Delete Files

By following these simple steps, you can quickly reclaim valuable storage space on your system. Regular use of Disk Cleanup ensures your PC stays efficient and prevents the buildup of unnecessary files that may slow down performance.

2. Enable and Configure Storage Sense

Windows 11 offers a smart built-in feature called Storage Sense that helps users automatically free up space without manual effort. It's especially useful for those who often forget to clean their systems. Enabling and customizing it ensures your PC stays optimized over time.

  1. Open Settings from the Start menu or by pressing Windows + I
  2. Go to the System section and select Storage from the left panel
  3. Find the Storage Sense option under Storage Management and toggle it to On
  4. Click on Storage Sense to access its configuration settings
  5. Choose how often you want Storage Sense to run (daily, weekly, or monthly)
  6. Set how long files should stay in your Recycle Bin before deletion
  7. Configure how Storage Sense handles the Downloads folder and OneDrive content

With Storage Sense properly configured, your system will automatically clear unnecessary files, freeing up disk space and improving performance. It’s a hassle-free way to keep your Windows 11 environment running smoothly with minimal intervention.

3. Remove Unused Apps and Features

Over time, your Windows 11 PC may accumulate a variety of apps and features that you no longer use. These programs can consume significant disk space and may even run in the background, slowing down system performance. Removing unused applications is a quick and effective way to free up storage.

  1. Click the Start button and open Settings
  2. Select Apps from the sidebar menu
  3. Click on Installed apps to view all applications on your device
  4. Sort the list by Size to identify large or storage-heavy apps
  5. Click the three-dot icon next to the app you want to remove
  6. Select Uninstall from the dropdown menu
  7. Follow the on-screen instructions to complete the uninstallation process

Regularly reviewing and removing applications you no longer need helps optimize both storage and performance. It's a good habit to evaluate your installed software every few months to ensure your system stays clean and clutter-free.

4. Clean Up Files from Windows Updates

Over time, Windows 11 stores old update files that are no longer needed once newer versions are installed. These leftover files can take up several gigabytes of space, slowing down your system. Cleaning them up can free space and improve your PC’s performance significantly.

  1. Press Windows + S and type Disk Cleanup, then press Enter
  2. In the Disk Cleanup window, select your system drive, usually C:
  3. Click OK to begin the scan for removable files
  4. Click on Clean up system files to scan for system-related files
  5. Once the scan completes, check Windows Update Cleanup from the list
  6. Review other file types if needed, then click OK
  7. Confirm by clicking Delete Files and allow the process to complete

Cleaning up Windows update files is safe and recommended after major updates. It not only frees up disk space but also helps maintain an organized system. Perform this cleanup regularly to prevent unnecessary file buildup and ensure your storage stays optimized.

Regularly performing disk cleanup in Windows 11 ensures your system stays fast and clutter-free. By following the steps above, you can free up space, prevent potential issues, and maintain optimal performance. Make it a routine to keep your PC running smoothly and efficiently.

Use Third-Party Tools for In-Depth Cleaning

While Windows 11 provides built-in features for storage management, sometimes you need more powerful tools to uncover hidden junk, large files, and performance-hogging clutter. Third-party utilities offer advanced options for deep cleaning that go beyond what Disk Cleanup and Storage Sense can do.

Top 5 Third-Party Disk Cleanup Tools for Windows 11:

  1. CCleaner: A trusted utility that cleans temporary files, browser cache, system logs, and even the Windows Registry. It also includes a software updater and startup manager.
  2. BleachBit: An open-source cleaner that deletes unnecessary files to free up space and guards your privacy. It supports over 70 applications.
  3. Wise Disk Cleaner: User-friendly and efficient, this tool cleans junk files, system caches, and browser histories. It also offers a disk defragmentation feature.
  4. Glary Utilities: A powerful all-in-one tool that includes disk cleanup, registry repair, memory optimization, and startup manager. Great for comprehensive maintenance.
  5. WinDirStat: A disk usage analyzer that visually maps out which files and folders are taking up the most space on your drive. Perfect for targeted cleanup.

These tools can drastically improve your computer's performance by digging deeper into areas often ignored by Windows’ native options. They're especially useful for advanced users looking for more precision and automation.

Using third-party tools in combination with Windows 11’s built-in features provides a balanced and thorough approach to disk management. With regular usage, you’ll enjoy a cleaner, faster, and more efficient system every day.

Additional Tips for Optimizing Disk Space

Keeping your storage clean goes beyond basic disk cleanup. By adopting a few smart habits and using the right features, you can significantly reduce clutter and improve your system’s performance over time. Below are ten practical tips to help you manage disk space efficiently.

  1. Move photos, videos, and large documents to cloud storage services like OneDrive or Google Drive to free up local space.
  2. Transfer rarely used files to an external hard drive or USB flash drive to keep your internal drive lean.
  3. Regularly clear your browser cache and download history to prevent unnecessary buildup.
  4. Delete old Windows update files by navigating to the Disk Cleanup system files option.
  5. Disable the hibernation feature to remove the hiberfil.sys file which can consume several gigabytes.
  6. Empty the Recycle Bin frequently to ensure deleted files are permanently removed from your system.
  7. Use file compression for large but rarely accessed folders to reduce their impact on disk space.
  8. Manage the Downloads folder by deleting outdated installers and unused files on a weekly basis.
  9. Uninstall optional Windows features or language packs you don’t need to save system resources.
  10. Avoid saving videos and high-resolution images directly to the system drive whenever possible.

With consistent effort and mindful file organization, you can maintain an optimized system that runs smoothly and efficiently. These tips will help ensure you make the most of your available storage without relying solely on cleanup tools.

Conclusion

Managing storage on Windows 11 is essential for maintaining optimal system performance. One of the most effective ways to free up space using Disk Cleanup is by regularly deleting temporary files and unnecessary data. It’s a simple, built-in tool that can quickly improve your PC’s efficiency.

For long-term results, combine Disk Cleanup with Storage Sense and uninstall unused apps. These practices help prevent your system from slowing down over time. Make storage optimization part of your regular maintenance routine to ensure a smoother, faster Windows 11 experience.